지금까지 기본 틀만 갖춰져 있던 페이지들에 Tailwind를 적용해 좀 더 보기 좋게 만드는 작업을 하려한다.
| 게시판 리스트 수정
frontend/src/pages/PostListPage.js
import React, { useEffect, useState, useContext } from 'react';
import axios from 'axios';
import { Link } from 'react-router-dom';
import { AuthContext } from '../context/AuthContext';

const PostListPage = () => {
  const [posts, setPosts] = useState([]);
  const [loading, setLoading] = useState(true);
  const { user } = useContext(AuthContext);

  useEffect(() => {
    const fetchPosts = async () => {
      try {
        const res = await axios.get('http://localhost:5000/api/posts');
        setPosts(res.data);
      } catch (err) {
        console.error('게시글 목록 로드 실패:', err);
      } finally {
        setLoading(false);
      }
    };

    fetchPosts();
  }, []);

  if (loading) return <p>로딩 중...</p>;

   return (
    <div className="max-w-3xl mx-auto py-10">
      <div className="flex justify-between items-center mb-6">
        <h1 className="text-2xl font-bold">📋 게시판</h1>
        {user && (
          <Link to="/posts/create" className="bg-blue-500 text-white px-4 py-2 rounded hover:bg-blue-600">
            글쓰기
          </Link>
        )}
      </div>

      <ul className="space-y-4">
        {posts.map(post => (
          <li key={post._id} className="p-4 border rounded shadow hover:bg-gray-50 transition">
            <Link to={`/posts/${post._id}`}>
              <h2 className="text-lg font-semibold text-blue-600 hover:underline">{post.title}</h2>
              <p className="text-sm text-gray-500">
                 {post.author.username} | {new Date(post.createdAt).toLocaleDateString('en-CA')}
              </p>
              <p className="mt-2 text-gray-700 line-clamp-2">{post.content}</p>
            </Link>
          </li>
        ))}
      </ul>
    </div>
  );
};

export default PostListPage;
/ max-w-3xl mx-auto : 중앙 정렬, 가로 폭 제한
/ flex justify-between : 제목과 글쓰기 버튼 양쪽으로 배치
/ hover:bg-gray-50 : 마우스 호버 효과
/ line-clamp-2 : 본문 요약 2줄로 제한 (Tailwind Line Clamp plugin 필요함)
- 설치하지 않아도 되지만 만약 line-clamp가 적용되지 않으면 npm install -D @tailwindcss/line-clamp로 설치한다.
- tailwind.config.js 에 추가한다.
module.exports = {
  // ...
  plugins: [require('@tailwindcss/line-clamp')],
};
이렇게 게시판 리스트 화면을 박스화해서 깔끔하게 정리했다.

| 게시판 상세 페이지 수정
게시글 목록에서 클릭해 들어오면 아래와 같은 상세화면이 나오는데 간격이 좁아 보기 불편하고 폰트 크기나 버튼의 경우도 디자인이 필요해 보인다.

frontend/src/pages/PostDetailPage.js
import React, { useEffect, useState, useContext } from 'react';
import { useParams, Link, useNavigate } from 'react-router-dom';
import axios from 'axios';
import { AuthContext } from '../context/AuthContext';

const PostDetailPage = () => {
  const { id } = useParams(); // URL 파라미터에서 post ID 추출
  const { user } = useContext(AuthContext);
  const [post, setPost] = useState(null);
  const [loading, setLoading] = useState(true);
  const [ message, setMessage ] = useState('');
  const navigate = useNavigate();

  // 게시글 불러오기
  useEffect(() => {
    const fetchPost = async () => {
      try {
        const res = await axios.get(`http://localhost:5000/api/posts/${id}`);
        setPost(res.data);
      } catch (err) {
        console.error('게시글 조회 실패:', err);
      } finally {
        setLoading(false);
      }
    };
    fetchPost();
  }, [id]);

   // 2️⃣ 삭제 요청
   const handleDelete = async () => {
    if (!window.confirm('정말 삭제하시겠습니까?')) return;

    try {
      const token = localStorage.getItem('token');
      await axios.delete(`http://localhost:5000/api/posts/${id}`, {
        headers: { Authorization: `Bearer ${token}` },
      });
      navigate('/posts');
    } catch (err) {
      console.error(err);
      setMessage('삭제 실패');
    }
  };

  if (loading) return <p>로딩 중...</p>;
  if (!post) return <p>게시글을 찾을 수 없습니다.</p>;

  const isAuthor = user && post.author._id === user._id;

  return (
    <div className="max-w-3xl mx-auto p-4 bg-white shadow rounded">
      <h2 className="text-2xl font-bold mb-2">{post.title}</h2>
      <div className="text-sm text-gray-500 mb-4">
        {post.author.username || '알 수 없음'} | {new Date(post.createdAt).toLocaleDateString('en-CA')}
      </div>
      <hr />
      <p className="whitespace-pre-wrap px-2 py-5">{post.content}</p>
      <br />

      <div className="mt-6 flex gap-2">
        {isAuthor && (
          <>
            <Link to={`/posts/edit/${post._id}`}>
              <button className="px-4 py-2 bg-yellow-400 rounded hover:bg-yellow-500">✏ 수정</button>
            </Link>
            <button onClick={handleDelete}className="px-4 py-2 bg-red-500 text-white rounded hover:bg-red-600">🗑 삭제</button>
          </>
        )}

          <Link to="/posts" >
            <button className="px-4 py-2 text-white bg-gray-600 rounded hover:bg-gray-700">📋 목록</button>
          </Link>

      </div>

      {message && <p>{message}</p>}

    </div>
  );
};

export default PostDetailPage;
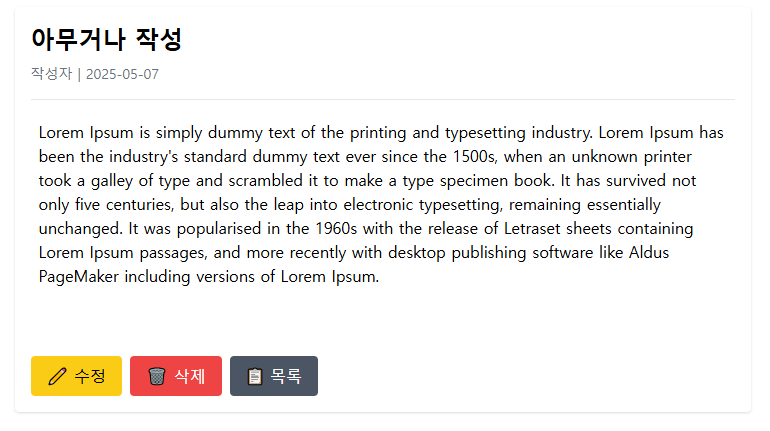
기존의 정리되지 않은 화면을 아래와 같이 tailwind를 적용해 좀 더 모양을 갖췄다. 제목을 크게 구분하고 여유로워진 여백과 눈에 띄는 버튼들이 좀 더 홈페이지 다워졌다.
작업을 하면서 불편함을 느꼈다. 비슷한 구조에 반복되는 클래스네임을 페이지마다 적어줄 생각을 하니 손가락이 뻐근해지는 느낌이다. (물론 복붙을 해도되지만.) 게다가 길게 넣어주던 className이 코드를 지저분하게 만들기도 하는데 이를 해결하기 위한 작업이 필요해보인다.
'STUDY > Project' 카테고리의 다른 글
| React 컴포넌트화(Componentization) (0) | 2025.05.19 |
|---|---|
| 게시판에 반복되는 Tailwind 공통 UI 클래스 분리하기 (0) | 2025.05.16 |
| Header 구성 변경 및 추가 - Sidebar (0) | 2025.05.12 |
| 페이지 라우팅 설정하기 (0) | 2025.05.11 |
| 반응형 내비게이션 - Navbar, lucide-react (0) | 2025.05.10 |

